Chocolate cake-decorating tips and ideas
These chocolate cake-decorating ideas offer tips for a professional finishing touch for your homemade chocolate cakes.
These simple ideas can help you to make your creative dreams come true.
And chocolate has to be the most edible ingredient for decorating cakes there is! Chocolate really comes into its own when used as the ingredient for your cake decorating idea.
Use these free and simple ideas and tips for decorating grown-ups' and kids' chocolate birthday cakes, wonderful wedding cakes, and for finishing off your cakes or gateaux in a special way.
There are cake decorating recipes for icing - used for piping frosting and decorating your cake. Or try a frosting recipe including a rich glossy satin chocolate glaze and a white chocolate frosting recipe, go to the frosting recipe page.
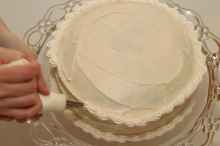
By following these instructions you can achieve the professional looking cake design you want - in your own kitchen. Yet, chocolate is one of the easiest ingredients to use to embellish your baking, as it melts and sets solid in almost any shape or form you want.
The best tip is, that chocolate cake decorations can be made up to four weeks in advance and stored in the refrigerator until required!
Also, check out how to melt chocolate and how to really get the best results for your chocolate recipes and cake-decorating by using the best quality gourmet chocolate.
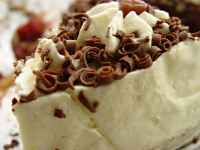
Small chocolate curls
It is a quick way of livening up your cakes. Ice or frost your cake with your favourite icing recipe, or chocolate ganache. Then, using a potato peeler shave off chocolate curls. The chocolate bar or block will need to be warm - around room temperature is usually fine. Scrape small curls by using the edge of your bar of chocolate. When you have mastered that, you can also make broader curls by scraping the peeler along the broad flat surface of the bar of chocolate.
You can use this as a very quick simple tip for cake-decorating, and is an equally useful idea for any last-minute decorating of your chocolate mousse, puddings, after dinner desserts and ice cream

Large chocolate curls and chocolate caraque
Spread melted chocolate in a thin layer on a marble slab or a clean and smooth work surface or baking sheet.
When the chocolate is just set, use a decorator's wallpaper stripping tool, (kept for this purpose!) and at an angle of about 25degrees, push it along the surface that the chocolate is on, and the chocolate should curl. If it does not curl, but breaks off, it has set too hard. You will then need to scrape it off and melt it again.
Smaller chocolate curls are made in the same way, and are called caraque.
Why not try a two-tone effect, melting dark and milk chocolate, or with white chocolate, then pipe or spread the alternating colours, and merge them with a pliable knife. Then follow the instructions above, scraping across the bands of chocolate. This gives a great, effective two tone effect.
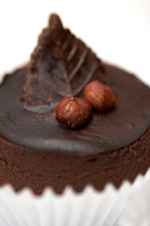
Chocolate Leaves
225g of chocolate is enough to make 45-50 leaves - depending on the size of the leaf.
Find any well defined, well shaped leaves that are free of chemical sprays.
The leaves must be clean, in perfect condition, still pliable and bone dry.
Melt the chocolate to be used, and with a small paintbrush, paint the underside of the leaves until well coated over the whole surface.
Leave to cool and set, - hasten if you need to by placing in a fridge. If the chocolate is too thin, then recoat. When you are happy with the result, peel the leaf carefully away from the chocolate, not the other way round!
Again you can try a two-tone effect, or even a marbled decorative effect. After drizzling white chocolate in stripes across, say, milk chocolate, you can create a marble effect. Use a toothpick to swirl the white chocolate through the dark or milk chocolate background to make an attractive swirly random pattern.
See what you can create, - you can try out many ideas for your own unique chocolate leaves design.
Piped chocolate shapes
115g of chocolate should be enough to make some designs for one chocolate cake.
This is a great way of making your own cake decorating ideas and designs; because chocolate can be whatever you want it to be!
Find a design or create your own design and draw it onto a piece of greaseproof paper.
Melt the chocolate. Then when it stays as a coating on the back of a spoon, without dripping off, it is ready to use.
Spoon the chocolate into a small paper piping bag. Snip off the tip of the bag and pipe the chocolate as evenly as possible following the desired design. Let the chocolate pipe itself, do not force it.
Leave the designs to set, and handle very carefully when moving, - don't forget they can melt in your hands and fingers. Then refrigerate by carefully storing between layers of greaseproof paper.
To remove the designs from the greaseproof paper, particularly intricate ones, it is best to cut the paper into squares around each design before gently removing the paper from the chocolate. If the chocolate is well set, remember it is brittle!
Here are some cake-decorating designs and ideas, which will, I'm sure give you more ideas.
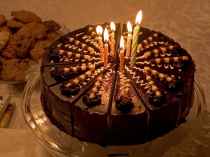
If it's for a birthday - why not decorate the cake using chocolate numbers for the age - instead of having candle numbers; and kids love eating things like that!
Swirls are easy, hearts are ideal for a romantic valentines cake decorating. Draw lattice shapes by criss-crossing the chocolate; create butterflies, flowers, circles, stars. You could easily match the design of your chocolate cake decorating ideas to link well with the theme of the party or wedding.
What you can draw, onto grease-proof paper, and carefully trace with melted chocolate in an icing piping bag, you can create with chocolate.
You can also pipe melted chocolate directly on to your cake's surface, say white chocolate heart designs on to a dark chocolate cake, already glazed with a glossy icing.
It's also a good decorating idea to add some curve to your piped designs, to make the design less flat and thereby less static.You do this by piping chocolate curls, swirls, wavy lines and lattices, or whatever you want onto greaseproof paper laid over a rolling pin, giving them an attractive curl.
These look very professional and elegant when attractively displayed in an already a rich chocolate cake covered with rich chocolate icing; and yet are a simple and easy chocolate cake decoration to make.
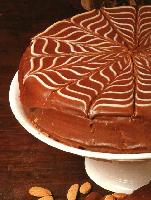
Feathering on chocolate cakes
This is a popular and pretty design for cake decorating, and works for any kind of chocolate cake recipe.
Melt a contrasting chocolate to the chocolate icing or covering being used. Spread the chocolate icing over the cake. Place the contrasting colour into a piping bag, and pipe lines or a spiral over the chocolate covered cake. With a skewer, draw lines across the cake, first one direction, then the other; this creates the feathered cake decoration.
Return from cake decorating tips and ideas to best chocolate recipes online home page.
Share this page:
What's This? Enjoy this page? Please pay it forward. Here's how...Would you prefer to share this page with others by linking to it? Click on the HTML link code below. Copy and paste it, adding a note of your own, into your blog, a Web page, forums, a blog comment, your Facebook account, or anywhere that someone would find this page valuable.<a href="https://www.best-chocolate-recipes-online.com/cake-decorating.html">Cake decorating, chocolate cake decorating ideas, tips and instructions.</a>
Yes, you can turn your interests into a really successful internet business?
Click here and find out how!
©best chocolate recipes online.com
Copyright Material 2006-14 All rights reserved
Solo Build It!
